1. Why are my indexed pages being blocked by robots.txt?
Your indexed pages may be blocked by the robots.txt file due to incorrect syntax, unintentional indexing, or search engine crawl delays.
2. How can I identify if my pages are indexed but blocked by robots.txt?
You can use Google Search Console or manually check search engine results to identify if your pages are indexed but blocked.
3. What is the purpose of the robots.txt file?
The robots.txt file serves as a set of guidelines that instruct search engine bots on which areas of the website should be crawled and indexed and which areas should be ignored.
4. Can I prevent specific pages or directories from being indexed?
Yes, you can use the Disallow directive in the robots.txt file to prevent specific pages or directories from being crawled and indexed by search engine bots.
5. Is it possible to override the Disallow directive?
Yes, you can use the Allow directive in the robots.txt file to override the Disallow directive and allow specific pages or directories to be crawled and indexed.
6. How can I update my robots.txt file?
You can update your robots.txt file by accessing the root directory of your website and modifying the file using a text editor.
7. What is the Meta Robots tag?
The Meta Robots tag is an HTML tag that can be added to individual webpages to provide instructions to search engine bots on how to crawl and index the page.
8. How does the Noindex HTTP header work?
The Noindex HTTP header is a server header that can be used to instruct search engine bots not to index a specific webpage.
9. How can I test and verify the changes made to my robots.txt file?
You can use Google Search Console to test and verify the changes made to your robots.txt file. Additionally, manual verification can be done by checking search engine results.
10. What should I do if my indexed pages are still blocked after making changes?
If your indexed pages are still blocked after making changes to your robots.txt file, double-check the syntax, ensure that the file is accessible, and consider reaching out to technical support or SEO professionals for further assistance.
Understanding Robots.txt
Robots.txt is a text file that webmasters create to instruct search engine robots, also known as crawlers or spiders, on how to crawl and index their website. It serves as a set of guidelines that inform search engines about which areas of the website should be crawled and indexed and which areas should be ignored. By using the robots.txt file, webmasters can control the behavior of search engine bots and prevent certain pages or directories from being indexed.
When a search engine bot visits a website, it first looks for the robots.txt file in the website’s root directory. The bot reads the instructions in the file and follows them accordingly. The robots.txt file uses a simple syntax that consists of two main components: User-agent and Disallow. The User-agent specifies the search engine bot to which the instructions apply, while the Disallow directive indicates the pages or directories that should not be crawled or indexed by that particular bot.
The robots.txt file can also include other directives such as Allow, Sitemap, and Crawl-delay. The Allow directive is used to override the Disallow directive and allow specific pages or directories to be crawled and indexed. The Sitemap directive specifies the location of the XML sitemap for the website, which helps search engines discover and index pages more efficiently. The Crawl-delay directive sets a delay in seconds between successive crawler requests to the website, which can be useful for preventing server overload.
Understanding the basics of robots.txt is crucial for properly managing the indexing of your website. Now that we have a clear understanding of what robots.txt is and how it works, let’s explore the common reasons for indexed pages being blocked and how to fix them.
What is Robots.txt?
Robots.txt is a small text file that is placed in the root directory of a website and serves as a set of instructions for search engine bots. It is an essential tool for webmasters to control the crawling and indexing behavior of search engines on their website. The robots.txt file uses a simple syntax that consists of directives that specify which pages or directories should be allowed or disallowed from being crawled and indexed.
Here are some key points to understand about robots.txt:
User-agent: This directive specifies the search engine bot to which the instructions apply. It allows webmasters to provide different instructions for different bots.
Disallow: This directive informs the search engine bot about the pages or directories that should not be crawled or indexed. It helps webmasters to restrict access to specific areas of their website.
Allow: This directive is used to override the Disallow directive and specify specific pages or directories that should be allowed for crawling and indexing.
Sitemap: This directive indicates the location of the XML sitemap for the website. The sitemap helps search engines discover and index pages more efficiently.
Crawl-delay: This directive sets a delay in seconds between successive crawler requests to the website. It can be useful for preventing server overload and ensuring a smooth crawl.
By properly configuring the robots.txt file, webmasters can control how search engines interact with their website, ensuring that sensitive or irrelevant pages are excluded from indexing. Now that we have a clear understanding of what robots.txt is, let’s delve into the common reasons for indexed pages being blocked and how to fix them.
How Robots.txt Works
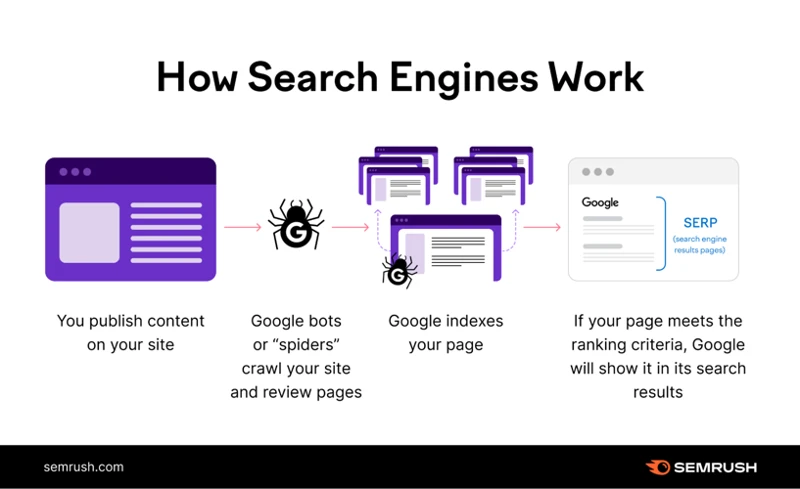
To understand how robots.txt works, it’s important to grasp the sequence of events when a search engine bot visits a website. Here’s a step-by-step breakdown of the process:
- The search engine bot initiates a crawl by sending a request to the website’s server.
- The server receives the request and checks for the presence of the robots.txt file in the root directory.
- If the robots.txt file is found, the server reads its instructions and determines whether the bot is allowed to crawl the requested page or directory.
- If the requested page or directory is disallowed, the server responds with a “Disallow” directive, and the bot moves on to the next request.
- If the requested page or directory is allowed, the server responds with a “Allow” directive or no directive at all, indicating that the bot can proceed with crawling and indexing.
- The search engine bot then analyzes the content of the allowed pages or directories and adds them to its index for future retrieval in search results.
It’s important to note that robots.txt is a voluntary protocol, and not all search engine bots may adhere to its instructions. While most well-behaved bots respect the directives in the robots.txt file, malicious bots or spammers may ignore these guidelines. It’s essential to implement additional security measures, such as using a referral spam filter, to protect your website from unwanted traffic.
Now that we have a solid understanding of how robots.txt works, let’s delve into the common reasons for indexed pages being blocked and explore how to address them.
Common Reasons for Indexed Pages

There are several common reasons why indexed pages may be blocked by the robots.txt file. Let’s take a closer look at each of these reasons:
1. Incorrect Robots.txt Syntax: One common reason for indexed pages being blocked is due to errors in the syntax of the robots.txt file. Even a small mistake in the syntax can result in unintended blocking of pages. It is important to ensure that the syntax is correct and that the User-agent and Disallow directives are properly defined.
2. Unintentional Indexing: Sometimes, webmasters may unintentionally allow search engine bots to index certain pages or directories that were intended to be blocked. This can happen if there are conflicting rules in the robots.txt file or if there are multiple versions of the file present on the website. It is important to review the robots.txt file regularly to avoid unintentional indexing.
3. Search Engine Crawl Delay: Search engines have limited resources and may set a crawl delay to prevent overloading websites with excessive requests. If a crawl delay is set in the robots.txt file, it can result in slower indexing of pages or even blocking of certain pages. It is important to understand and manage the crawl delay effectively to ensure timely indexing.
By understanding these common reasons for indexed pages being blocked, you can take appropriate steps to fix the issues and ensure that your pages are properly indexed. In the next section, we will discuss how to identify indexed pages and determine if they are blocked by the robots.txt file.
Incorrect Robots.txt Syntax
Incorrect syntax in the robots.txt file can lead to unintended consequences and may result in indexed pages being blocked. Here are some common mistakes to avoid:
1. Missing or misplaced syntax: Ensure that the robots.txt file follows the correct syntax. Each directive should be on a separate line, and the User-agent and Disallow directives should be properly formatted. For example, using the asterisk (*) as a wildcard character to block all search engine bots should be written as:
User-agent: *
Disallow: /
2. Incorrect placement of directives: It’s important to place the directives in the correct order. The User-agent directive should come before the Disallow directive. Placing them in the wrong order can cause search engine bots to misinterpret the instructions.
3. Typos and misspellings: Double-check for any typos or misspellings in the robots.txt file. Even a small error can lead to unintended consequences. For example, if you intended to block a directory called “/private”, but mistakenly wrote “/prvate”, the search engine bot may not interpret the instruction correctly.
4. Overlapping directives: Avoid overlapping directives that may conflict with each other. For instance, if you have both a Disallow and an Allow directive for the same page or directory, the search engine bot may be unsure of how to proceed.
To fix incorrect robots.txt syntax, carefully review the file and make the necessary corrections. Ensure that the directives are properly formatted, placed in the correct order, and free of any typos or misspellings. Once the corrections have been made, save the file and upload it to the root directory of your website. This will allow search engine bots to properly crawl and index your website according to the updated instructions.
Now that we understand the implications of incorrect robots.txt syntax, let’s move on to explore another common reason for indexed pages being blocked: unintentional indexing. If you want to learn how to fix pages that are discovered but currently not indexed, click here.
Unintentional Indexing
Unintentional indexing occurs when pages that were not intended to be indexed by search engines end up being crawled and indexed. This can happen due to various reasons, such as misconfigurations, internal linking issues, or outdated content management systems.
One common cause of unintentional indexing is when developers or website administrators forget to add the necessary instructions in the robots.txt file to disallow certain pages or directories. This can result in search engine bots crawling and indexing sensitive or duplicate content that should not be visible in search results.
Another cause of unintentional indexing is internal linking. When a page on a website includes links to other pages that are not blocked by the robots.txt file, search engine bots can follow these links and index the unintended pages. It is important to regularly review and update internal links to ensure that only the desired pages are accessible to search engines.
Outdated content management systems can also contribute to unintentional indexing. If a website is built on an older CMS that does not have proper indexing controls, search engine bots may be able to access and index pages that were meant to be excluded. Upgrading to a newer CMS or implementing additional security measures can help prevent unintentional indexing.
To fix unintentionally indexed pages, it is important to first identify the pages that should not be indexed. This can be done by conducting a thorough audit of the website and analyzing the search engine results pages (SERPs) to see which pages are appearing in the index. Once the problematic pages have been identified, they can be properly blocked by updating the robots.txt file or using other methods such as the meta robots tag or the noindex HTTP header.
By addressing the issue of unintentional indexing, you can ensure that only the relevant and desired pages of your website are indexed by search engines, improving the overall visibility and search engine rankings.
Search Engine Crawl Delay
Search Engine Crawl Delay is a directive in the robots.txt file that allows webmasters to specify a delay in seconds between successive requests from search engine bots. This directive is particularly useful for websites that experience high traffic or have limited server resources, as it helps prevent server overload and ensures that the website remains accessible to users.
By setting a crawl delay, webmasters can control the frequency at which search engine bots crawl their website. This can be beneficial in scenarios where the website’s server may not be able to handle a large number of simultaneous requests. The crawl delay directive gives the server some breathing room by specifying the minimum time interval that should elapse between crawler requests.
To implement a crawl delay, webmasters can add the “Crawl-delay” directive followed by the desired delay value (in seconds) to their robots.txt file. For example, if a webmaster wants to set a crawl delay of 5 seconds, they would add the following line to their robots.txt file:
User-agent: *
Crawl-delay: 5
It’s important to note that not all search engines support the crawl delay directive. While major search engines like Google and Bing generally respect the directive, others may not. Additionally, the crawl delay directive is treated as a suggestion rather than a strict rule, so search engine bots may not always adhere to the specified delay.
By utilizing the search engine crawl delay directive in the robots.txt file, webmasters can effectively manage the crawling behavior of search engine bots and ensure that their website remains accessible and responsive to both users and search engines. Now let’s move on to the next section and learn how to identify indexed pages on your website.
Identifying Indexed Pages

Identifying indexed pages is an important step in fixing pages that are blocked by the robots.txt file. There are several methods you can use to determine if a page is indexed by search engines.
One way to identify indexed pages is by using Google Search Console. This free tool provided by Google allows you to monitor your website’s performance in search results. To check if a page is indexed, simply log in to Google Search Console, select your website, and navigate to the “Coverage” report. This report will provide you with a list of indexed pages, as well as any errors or issues that may be affecting the indexing process.
Another method to manually check if a page is indexed is by conducting a search on a search engine. Simply enter “site:yourwebsite.com” followed by the specific page URL you want to check. For example, if you want to check if the page “/how-to-make-a-niche/” is indexed, you would search for “site:yourwebsite.com/how-to-make-a-niche/”. The search results will show if the page is indexed by displaying it in the search results.
By utilizing these methods, you can easily identify which pages of your website are indexed and determine if any of them are being blocked by the robots.txt file. Having this information will help you proceed with the necessary steps to fix any indexing issues.
Using Google Search Console
Using Google Search Console is an effective way to identify indexed pages that are blocked by the robots.txt file. Here’s how you can use this powerful tool to troubleshoot and fix the issue:
1. Access Google Search Console: Log in to your Google Search Console account and select the website you want to analyze.
2. Navigate to the Index Coverage Report: In the left-hand menu, click on “Index” and then select “Coverage.” This report will show you the status of indexed pages on your website.
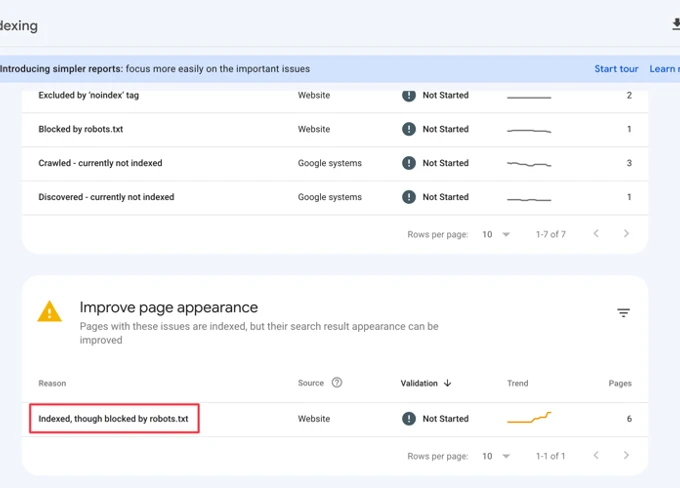
3. Review the Error Status: Look for any pages marked with an error status, specifically the “Blocked by robots.txt” error. This indicates that the page is being blocked from indexing by the robots.txt file.
4. Inspect the Blocked Page: Click on the specific error to get more details about the blocked page. The “URL Inspection” tool will provide information on why the page is being blocked.
5. Verify Robots.txt Blocking: In the URL Inspection tool, you can click on the “Coverage” tab to see if the page is indeed blocked by the robots.txt file. This will help confirm if the issue is related to the robots.txt file.
6. Update Robots.txt: If you find that the page is incorrectly blocked, you can update the robots.txt file to allow the page to be crawled and indexed. Make sure to follow the correct syntax and specify the correct User-agent and Disallow directives.
7. Request Indexing: After updating the robots.txt file, you can use the “Request Indexing” feature in Google Search Console to submit the page for re-crawling and indexing. This will help expedite the process of getting the page indexed.
Using Google Search Console gives you valuable insights into the indexing status of your website and allows you to make necessary changes to fix any issues with pages being blocked by the robots.txt file. By following these steps, you can ensure that your pages are properly indexed and visible in search engine results.
Manually Checking Search Engine Results
Manually checking search engine results is a useful method for identifying indexed pages that may be blocked by the robots.txt file. Although it may not be as comprehensive as using tools like Google Search Console, it can still provide valuable insights.
To manually check search engine results, start by choosing a specific page or directory that you suspect may be blocked. Then, open a search engine like Google and enter the following search query: “site:yourwebsite.com/page”. Replace “yourwebsite.com/page” with the actual URL of the page or directory you want to check.
The search engine will display a list of results that includes any indexed pages matching your query. Take a close look at the search results and see if the page you are checking appears. If it does not appear in the search results, it could indicate that the page is indeed blocked by the robots.txt file.
Additionally, you can also check if the meta description and title tags of the page are displayed correctly in the search results. If these elements are missing or appear differently than expected, it may indicate that the page is not being properly indexed.
Manually checking search engine results can give you a quick overview of which pages are indexed and how they are displayed. However, keep in mind that this method may not be as accurate or up-to-date as using specialized tools. For a more comprehensive analysis, it is recommended to use Google Search Console or other SEO tools to identify and fix any indexing issues with your website.
Fixing Indexed Pages
Fixing indexed pages that are blocked by the robots.txt file is essential to ensure that your website’s content is visible and accessible to search engines. Here are some effective methods to fix indexed pages:
1. Updating Robots.txt: One of the most common reasons for indexed pages being blocked is due to incorrect syntax in the robots.txt file. To fix this, carefully review your robots.txt file and ensure that it does not contain any errors or typos. Make sure that the pages or directories you want to be indexed are not being disallowed by the file. Once you have made the necessary changes, save and upload the updated robots.txt file to your website’s root directory.
2. Using Meta Robots Tag: Another way to fix indexed pages is by using the meta robots tag in the HTML code of the specific pages you want to block from search engine indexing. By adding the <meta name="robots" content="noindex"> tag to the head section of these pages, you can instruct search engines not to index them. This method is especially useful if you want to block individual pages rather than entire directories.
3. Using Noindex HTTP Header: Alternatively, you can use the noindex HTTP header to prevent search engines from indexing specific pages. This method involves configuring your web server to send the noindex header when serving the desired pages. By implementing this header, you effectively communicate to search engine bots that the page should not be indexed. Consult your web server’s documentation or seek assistance from your web hosting provider to properly implement this method.
By implementing these methods, you can fix indexed pages that are blocked by the robots.txt file and ensure that your website’s content is visible to search engines. It is important to note that after making these changes, it may take some time for search engines to re-crawl and re-index your updated pages. It is recommended to monitor the changes using the methods discussed in the next section to ensure that the fixes have been successfully implemented.
Updating Robots.txt
To fix indexed pages that are blocked by the robots.txt file, one of the first steps is to update the robots.txt file with the correct syntax and directives. Here are some key points to consider when updating the robots.txt file:
1. Use the correct syntax: The robots.txt file follows a specific syntax that must be adhered to in order for it to work correctly. Make sure to use the correct format for specifying user-agents, directives, and paths. Incorrect syntax can lead to unintended blocking or allowing of pages.
2. Specify the User-agent: When updating the robots.txt file, it’s important to specify the user-agent to which the directives apply. This allows you to provide specific instructions for different search engine bots. For example, you can target Googlebot with “User-agent: Googlebot” and provide separate instructions for other bots.
3. Use the Disallow directive: The Disallow directive is used to block search engine bots from crawling and indexing specific pages or directories. Use this directive to prevent unwanted pages from being indexed. For example, to block a directory named “private”, use “Disallow: /private/”.
4. Implement the Allow directive: If you have previously used the Disallow directive to block certain pages or directories but now want to allow them to be indexed, you can use the Allow directive. This directive overrides the Disallow directive and allows specific pages or directories to be crawled and indexed. For example, if you have “Disallow: /images/” but want to allow the “/images/products/” directory to be indexed, you can add “Allow: /images/products/”.
5. Test the robots.txt file: After making changes to the robots.txt file, it’s important to test it to ensure that it is working as intended. Use tools like the robots.txt Tester in Google Search Console to check for any errors or warnings. This will help you identify any issues and make necessary adjustments.
Remember, any changes made to the robots.txt file may take some time to be reflected in search engine results. It’s important to monitor the changes and verify that the desired pages are no longer blocked and are being indexed properly. By updating the robots.txt file correctly, you can ensure that search engine bots are able to crawl and index your website effectively.
Using Meta Robots Tag
The Meta Robots tag is an HTML tag that can be used to provide specific instructions to search engine bots regarding the indexing and crawling of individual web pages. It allows webmasters to override the instructions given in the robots.txt file for a particular page.
To use the Meta Robots tag, you need to add it to the head section of your HTML document. Here’s an example of how the tag looks:
“`html
“`
The `name` attribute specifies that the tag is for robots, and the `content` attribute contains the instructions for the search engine bots.
There are several directives you can use within the Meta Robots tag to control how search engine bots interact with your page:
1. `index`: This directive tells search engine bots to include the page in their index. If you want a page to be indexed, you should include this directive.
2. `noindex`: This directive tells search engine bots not to include the page in their index. If you want to prevent a page from being indexed, you should include this directive.
3. `follow`: This directive tells search engine bots to follow the links on the page. If you want search engine bots to crawl the links on the page, you should include this directive.
4. `nofollow`: This directive tells search engine bots not to follow the links on the page. If you want to prevent search engine bots from crawling the links on the page, you should include this directive.
By using the Meta Robots tag, you can have more granular control over the indexing and crawling of individual pages on your website. It can be particularly useful if you want to prevent certain pages from being indexed while allowing others to be indexed. Keep in mind that the Meta Robots tag works on a page-by-page basis, so you will need to add it to each individual page where you want to apply specific instructions.
Now that you understand how to use the Meta Robots tag, let’s move on to explore another method for fixing indexed pages that are blocked by the robots.txt file.
Using Noindex HTTP Header
Using the Noindex HTTP header is another effective method to prevent search engines from indexing specific pages on your website. When a search engine bot crawls a webpage, it looks for the presence of the Noindex directive in the HTTP header of the page. If the Noindex directive is found, the search engine understands that the page should not be indexed.
Implementing the Noindex HTTP header can be done at the server level or through the use of plugins or code snippets. Here’s how you can use the Noindex HTTP header to fix indexed pages:
1. Server-Level Implementation: If you have access to your server’s configuration files, you can add the Noindex directive to the HTTP header of specific pages or directories. This will send a signal to search engines not to index those pages. Here’s an example of how to implement the Noindex HTTP header using Apache web server’s .htaccess file:
“`
Header set X-Robots-Tag “noindex”
“`
In this example, “page-to-noindex.html” is the name of the page that you want to prevent from being indexed. The X-Robots-Tag “noindex” directive is added to the HTTP header of that page.
2. Plugin or Code Snippet Implementation: If you’re using a content management system (CMS) like WordPress, you can utilize plugins or code snippets to add the Noindex directive to specific pages or posts. There are various SEO plugins available that offer the option to set the Noindex attribute for individual pages or posts. Simply install a reputable SEO plugin, navigate to the page or post you want to noindex, and enable the Noindex option.
Using the Noindex HTTP header is a powerful method to control which pages get indexed by search engines. It allows you to have more fine-grained control over indexing compared to the robots.txt file. However, it’s important to note that the Noindex directive does not prevent search engines from crawling the page. If you want to completely block search engine access to a page, you can combine the Noindex directive with the Disallow directive in the robots.txt file.
Now that you know how to use the Noindex HTTP header, let’s move on to the next section where we will discuss testing and verifying the changes you’ve made to fix indexed pages.
Testing and Verifying Changes
After making changes to your robots.txt file or implementing other methods to fix indexed pages, it is crucial to test and verify these changes to ensure they have been correctly implemented and have the desired effect.
One way to test and verify changes is by using the Google Search Console. This powerful tool provides valuable insights into how Google sees and indexes your website. After making changes to your robots.txt file, you can use the URL Inspection tool in the Search Console to check if the affected pages are now being properly crawled and indexed. Simply enter the URL of the page you want to check and click on “Request indexing” to prompt Google to recrawl the page.
Another method for manual verification is to do a search engine query to check if the indexed pages are still appearing in the search results. Simply enter the URL of the page in the search bar and see if it shows up. If the page is no longer indexed, it means your changes have been successful. However, if the page still appears in the search results, you may need to revisit your changes and ensure they were implemented correctly.
It’s important to note that changes to your robots.txt file may take some time to be fully processed by search engines. It’s recommended to monitor the changes over a period of time to ensure they have the desired effect.
Testing and verifying changes is a crucial step in the process of fixing indexed pages. By using tools like the Google Search Console and performing manual searches, you can ensure that your changes are working as intended and that your pages are being properly crawled and indexed. Now that you have successfully fixed your indexed pages, you can rest assured that your website is optimized for search engine visibility.
Using Google Search Console
Google Search Console is a powerful tool that can help you identify and manage indexed pages that are blocked by robots.txt. It provides valuable insights and diagnostics about your website’s performance in Google search results. Here’s how you can use Google Search Console to fix indexed pages that are blocked by robots.txt.
1. Verify your website: The first step is to verify your website in Google Search Console. This involves adding and verifying your website by following the provided instructions. Once your website is verified, you will have access to the various features and reports.
2. Navigate to the Index Coverage Report: In the left-hand menu of Google Search Console, click on “Index” and then “Coverage”. This report will show you the status of your indexed pages and any issues related to indexing, including pages blocked by robots.txt.
3. Identify the blocked pages: In the Index Coverage Report, look for the “Blocked by robots.txt” section. This will display a list of pages that are currently being blocked by the robots.txt file. Take note of these pages as they will need to be addressed.
4. Test robots.txt file: In Google Search Console, go to the “URL Inspection” tool and enter the URL of a blocked page. Click on “Inspect URL” and then “View Tested Page”. This will show you the current status of the page and whether it is blocked by robots.txt.
5. Fix the issue: If you find that a page is incorrectly blocked by robots.txt, you will need to update the robots.txt file to allow the page to be crawled and indexed. Alternatively, if the page should be blocked, make sure that the robots.txt file is correctly configured.
6. Validate the fix: After updating the robots.txt file, go back to the Index Coverage Report and click on the “Validate Fix” button. This will prompt Google to re-crawl the affected pages and verify if they are no longer blocked by robots.txt.
Using Google Search Console is an effective way to identify and resolve issues with indexed pages that are blocked by robots.txt. By regularly monitoring the Index Coverage Report and making necessary fixes, you can ensure that your website is properly indexed and visible in search engine results.
Manual Verification
Manual verification is an important step in ensuring that the changes made to fix indexed pages blocked by the robots.txt file have been implemented correctly. While using Google Search Console provides a convenient way to check the status of indexed pages, manual verification allows you to personally inspect the search engine results pages (SERPs) to confirm if the changes have taken effect.
To manually verify the changes, you can follow these steps:
1. Perform a search on a search engine using relevant keywords and phrases that are associated with the pages you have updated. For example, if you have fixed the indexing of a specific product page on your website, search for the product name.
2. Scan through the search results and look for the specific page you have fixed. Check if the page appears in the search results and if it is accompanied by a relevant title and description. This indicates that the page has been successfully indexed.
3. Click on the link to the indexed page and ensure that it loads properly without any errors. Check if the content and structure of the page match your expectations.
4. Repeat the process for different search engines to ensure that the changes have been reflected across multiple platforms.
Manual verification allows you to directly observe the impact of the changes you have made. It provides an opportunity to catch any remaining issues or discrepancies and make further adjustments if necessary. By combining manual verification with the tools provided by Google Search Console, you can have a comprehensive understanding of the status of your indexed pages and ensure that they are no longer blocked by the robots.txt file.
Remember, manual verification should be an ongoing process. Regularly check the indexed pages to ensure that they are being crawled and indexed correctly. This will help you maintain a healthy and optimized website presence in search engine results.
Conclusion
In conclusion, understanding and effectively managing the robots.txt file is essential for ensuring that your website’s pages are properly indexed by search engines. By correctly configuring the robots.txt file, you can control which parts of your website are crawled and indexed, preventing sensitive or irrelevant pages from appearing in search results.
Throughout this article, we have discussed the concept of robots.txt and how it works, as well as the common reasons for indexed pages being blocked. We have also provided step-by-step instructions on how to identify and fix these issues, including updating the robots.txt file, using the meta robots tag, and employing the noindex HTTP header.
Remember, it is crucial to regularly test and verify any changes made to the robots.txt file to ensure that they have been implemented correctly. Utilizing tools such as Google Search Console can help you monitor the indexing status of your pages and identify any potential issues that need to be addressed.
By following the guidelines and best practices outlined in this article, you can effectively manage your website’s indexing and ensure that your valuable content is accessible to search engine users. So, take the necessary steps to fix any indexed pages blocked by robots.txt and optimize your website’s visibility in search engine results.
Frequently Asked Questions
FAQs about Fixing Indexed Pages Blocked by Robots.txt
1. Why are my indexed pages being blocked by robots.txt?
Your indexed pages may be blocked by the robots.txt file due to incorrect syntax, unintentional indexing, or search engine crawl delays.
2. How can I identify if my pages are indexed but blocked by robots.txt?
You can use Google Search Console or manually check search engine results to identify if your pages are indexed but blocked.
3. What is the purpose of the robots.txt file?
The robots.txt file serves as a set of guidelines that instruct search engine bots on which areas of the website should be crawled and indexed and which areas should be ignored.
4. Can I prevent specific pages or directories from being indexed?
Yes, you can use the Disallow directive in the robots.txt file to prevent specific pages or directories from being crawled and indexed by search engine bots.
5. Is it possible to override the Disallow directive?
Yes, you can use the Allow directive in the robots.txt file to override the Disallow directive and allow specific pages or directories to be crawled and indexed.
6. How can I update my robots.txt file?
You can update your robots.txt file by accessing the root directory of your website and modifying the file using a text editor.
7. What is the Meta Robots tag?
The Meta Robots tag is an HTML tag that can be added to individual webpages to provide instructions to search engine bots on how to crawl and index the page.
8. How does the Noindex HTTP header work?
The Noindex HTTP header is a server header that can be used to instruct search engine bots not to index a specific webpage.
9. How can I test and verify the changes made to my robots.txt file?
You can use Google Search Console to test and verify the changes made to your robots.txt file. Additionally, manual verification can be done by checking search engine results.
10. What should I do if my indexed pages are still blocked after making changes?
If your indexed pages are still blocked after making changes to your robots.txt file, double-check the syntax, ensure that the file is accessible, and consider reaching out to technical support or SEO professionals for further assistance.